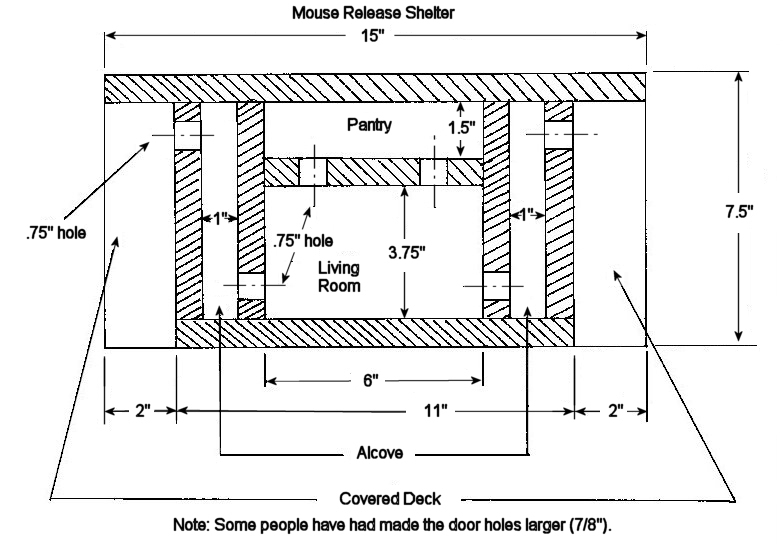
I've had a few requests on how to build a release shelter. This is one I've designed and used. This shelter includes a number of features to aid short term survival until the mice can relocate themselves to more natural accommodations. I recommend this shelter for up to 4 mice. A larger shelter would hold more mice, but may not fit into an aquarium for the mice to enter. This shelter will fit inside a standard 10 gallon aquarium.
MM Shows Off the Wild Mouse Release Shelter
View all of neurozool's videos on YouTube.
Features
Materials
Instructions
The shelter is constructed using the 1X8 boards at the floor and roof with the furring strip making up the walls. The furring strips should have the short side against the floor and roof providing a 1.5" high living space. Cut the floor and roof to length and sand these pieces. Cut, drill and sand the walls from the furring strip. Make sure the finished pieces all fit together properly. Screw the walls onto the floor using at least 2 screws per wall; this will keep them from shifting. Use 4 screws on the 15" wall and 3 on the 11" wall. Mark the centers of all the walls on the roof so you have a guide for the screws. Use at least 1 screw per wall on this side. Use 5 screws on the 15" wall and 4 on the 11" wall on the roof side. This should provide a very sturdy shelter.
After everything is complete, remove the roof and fill the Living Room with crumpled white unscented toilet paper for nesting material and fill the pantry with food. Replace the roof and place the shelter in the cage or aquarium the night before release. This shelter was designed to fit a 10 gallon aquarium; I'm not sure if it will fit inside a cage. Seal the entrances with duct tape to keep the mice from escaping during transport. Find a suitable release location to place the shelter, remove the duct tape (important), and your done. The mice should find suitable natural shelter in a few days.
To download the drawing for printing, right click on the image and select "Save as" (IE's option is "Save picture as" and Mozilla's option is "Save image as"). After you save the drawing you can print it. I would recommend selection "landscape" as the print format. Make any changes you think appropriate.
These plans could have more detail and I will try to update them as I can. If you have any questions, please feel free to email me: Bucky Goldstein.
Plans
